Adding a
Real Time Clock
to the BeagleBone Black
Introduction
One of the shortcomings of the BeagleBone Black is the lack of a hardware real time clock (RTC). In most situations when running Allstar a RTC is not necessary because the user would have access to the Internet and could utilize ntp to update at boot and continuously sync the time thereafter. It is possible that a situation could arise where a user either did not have an Internet connection, such as when using Allstar as a repeater controller at a location where there was no Internet, or if for some reason ntp was not accessible.
|
The BBB Archlinux Allstar distro uses both the ntpd and ntpdate services to update the clock at boot. Without a RTC the state of the clock is undetermined (usually a 1999 date) until ntp updates shortly after boot. If ntp does not update, the clock will remain in this inaccurate state. Archlinux also has a time utility called 'timedatectl' where you can check the status of the time. 'timedatectl' also has a built-in ntp client which can be turned on or off. It is not necessary to have both the 'timedatectl' ntp and the ntpd and ntpdate services all running. ntpd and ntpdate are supersets of the 'timedatectl' ntp and would only be needed in more sophisticated timing situations not ordinarily encountered by the average user. |
Acquiring the Board
The board is available from Adafruit as a very simple kit. I paid $8 but it may be a dollar or two more now. It uses the very accurate DS1307 RTC IC which interfaces to the BBB via one of its i2c ports.
|
I˛C (Inter-Integrated Circuit), pronounced I-squared-C, is a multi-master, multi-slave, single-ended, serial computer bus invented by Philips Semiconductor, known today as NXP Semiconductors, used for attaching low-speed peripherals to computer motherboards and embedded systems. Alternatively I˛C is spelled I2C (pronounced I-two-C) or IIC (pronounced I-I-C). |
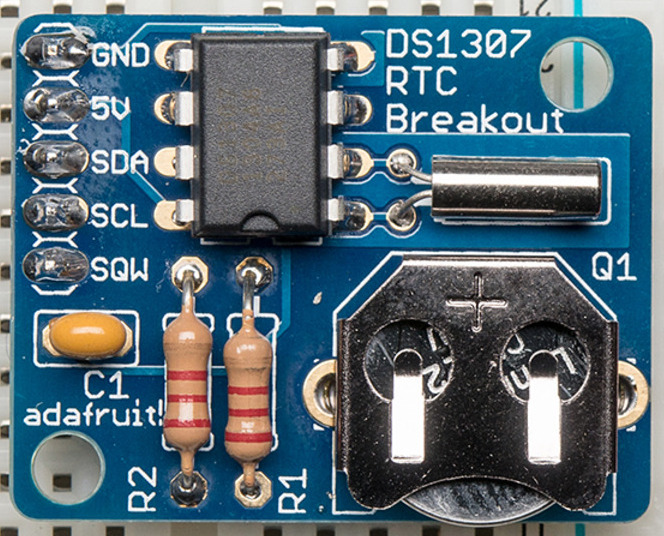 |
DS1307 Kit at Adafruit |
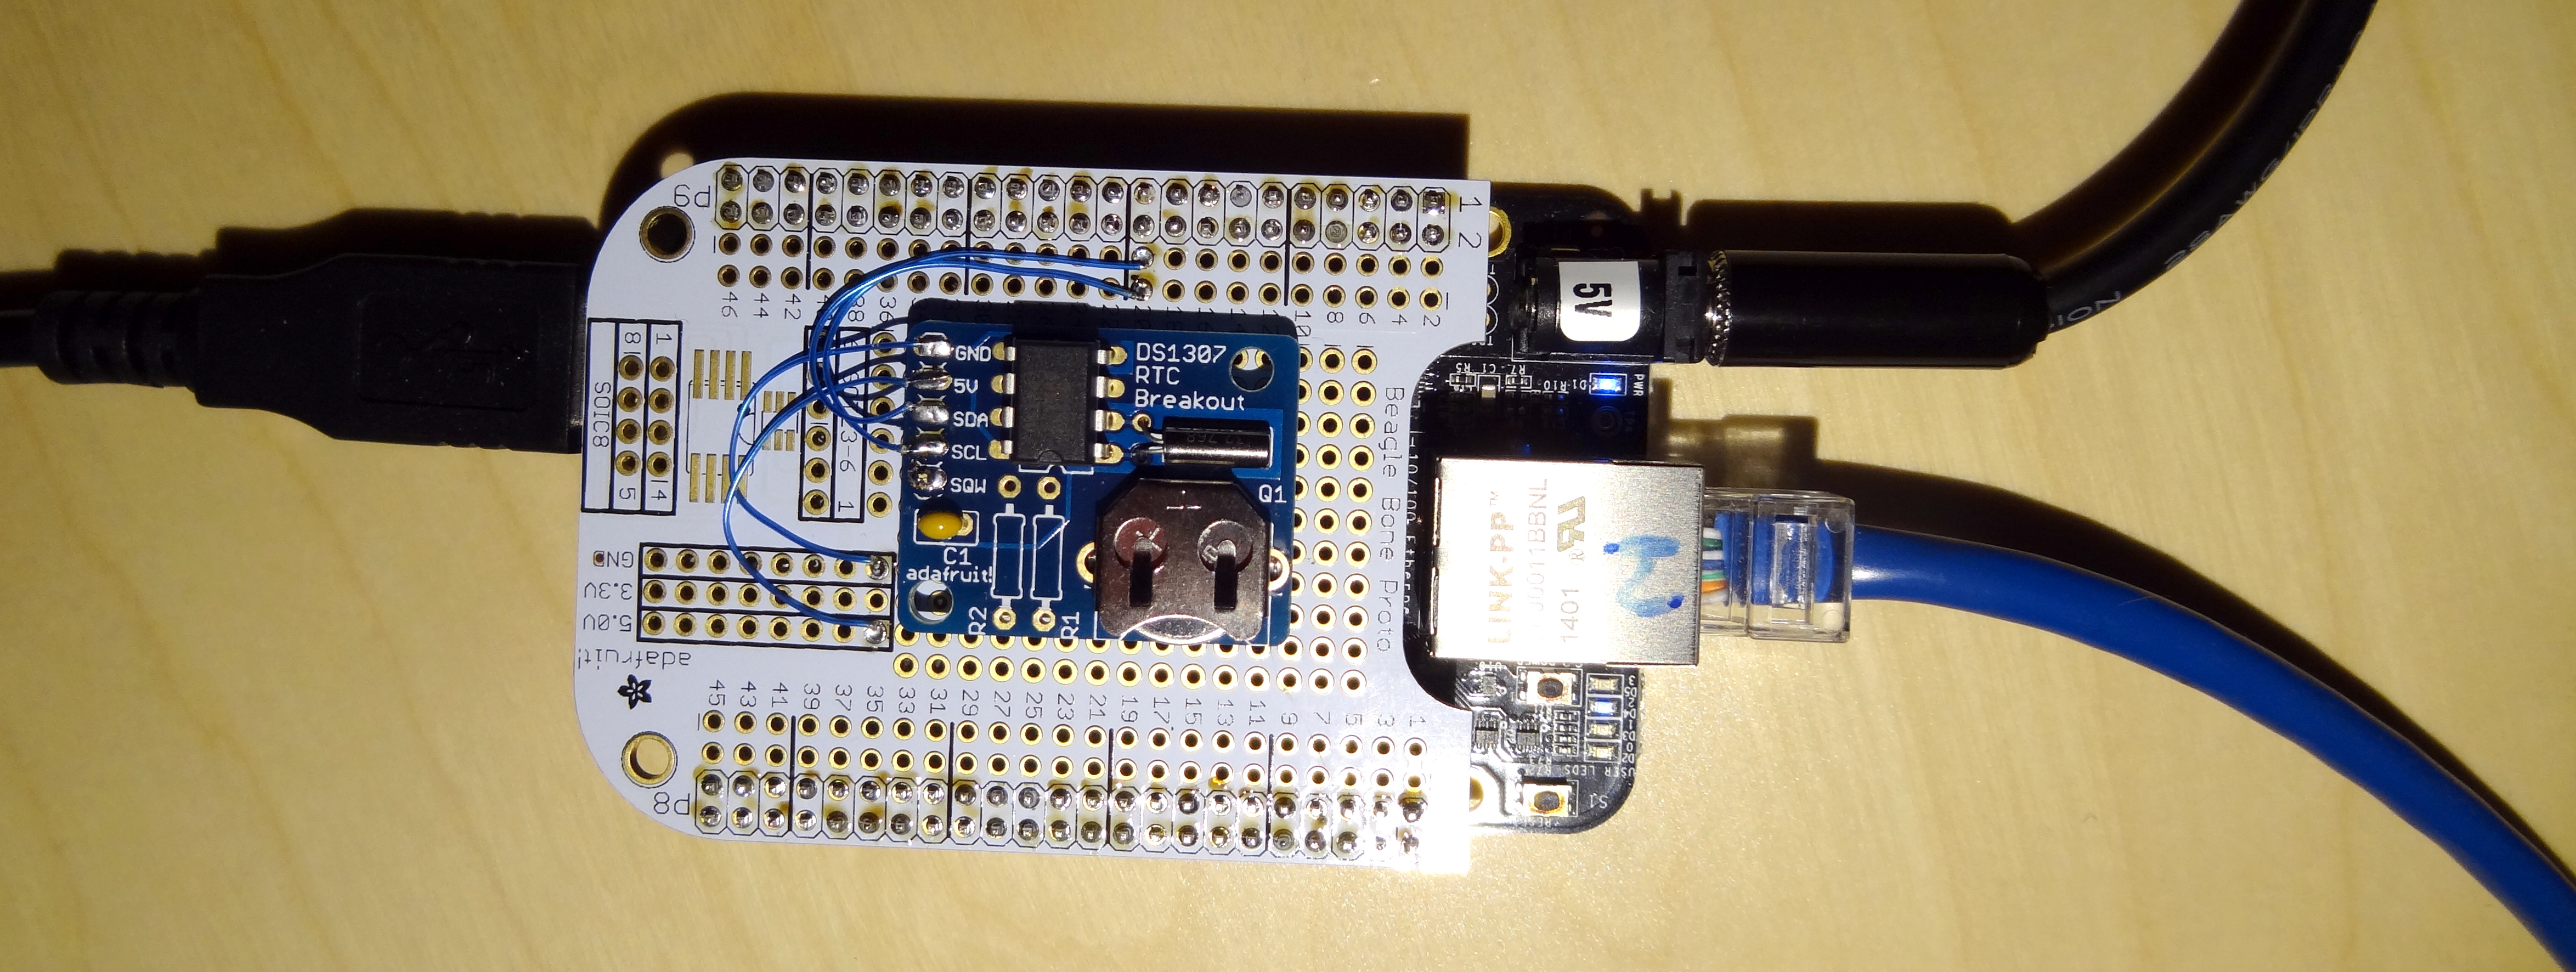
The DS1307 kit could be directly connected to the BBB using connector pins but to make it easier I used a Proto Cape also available from Adafruit. They have very reasonable prices on their products.

Building and connecting the Board
The kit is built using the parts supplied but DO NOT install the two resistors, R1 and R2. This will allow interfacing to the 3.3 volt BBB i2c bus. Only four connections are needed to the BBB, +5V, Gnd, and the SDA and SCL data connections. This uses the i2c-2 bus on the BBB which assigns SDA to P9 pin 20 and SCL to P9 pin 19. On the proto cape +5 and gnd can easily be found on a separate pad area.
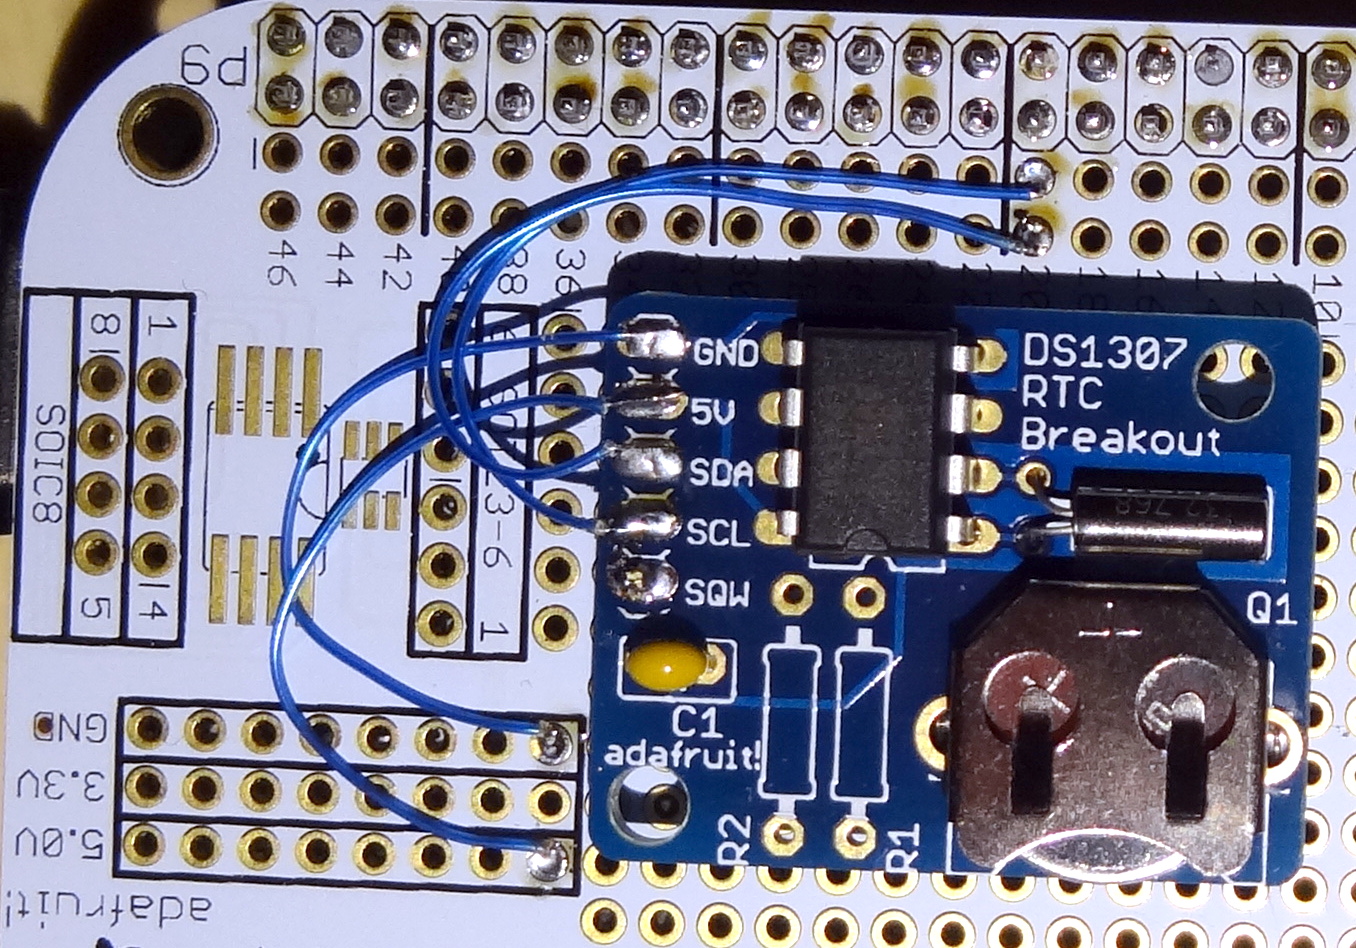
Here is a close-up view of the finished board mounted on the proto cape. The SQW pin was used to mount the RTC board to a blank pad of the cape. This is adequate to hold it in place and keep it elevated slightly above the cape. As you can see the board is very simple with only the DS1307 IC, the crystal, a capacitor, and the coin battery in its socket.
Making it Play with BBB Archlinux Allstar
Now for the software to make it run. The 1.2.1 image with the 3.16.3-1-ARCH kernel has the i2c-2 port which is mapped to P9 pins 19 and 20 enabled. To check the bus you will need to install a set of tools which are not included in the 1.2.1 release. Here is how to install it.
pacman -S i2c-tools
You may need to use -Sy in the above command.
Once installed you can issue the command:
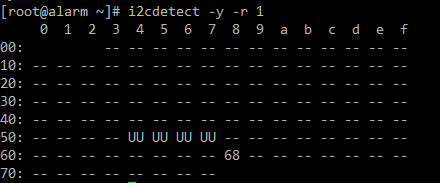
i2cdetect –y –r 2
This will show a map that should look similar to this and show the address of the DS1307 - 68 - as active.
Now it is time to connect the device and see if you can read the time. execute the following command:
echo ds1307 0x68 >/sys/bus/i2c/devices/i2c-2/new_device
If all is well you should get the prompt back with no errors. Now lets make sure it is registered and that you can read it. Enter the following:
cat /sys/class/rtc/rtc1/name
You should see:
[root@BBB-40638 ~]# cat /sys/class/rtc/rtc1/name ds1307
Which is the name of the RTC chip. Now enter:
cat /sys/class/rtc/rtc1/time
You can also substitute 'date' for 'time' but since the clock is not set it will be meaningless. You can later use these commands to look at your RTC directly for testing. The RTC when set is UTC time.
You should see some random time as the clock is not set. Hit the up-arrow key and re-execute the command. Do this several times and the time should be incrementing like a normal clock.
Now we are ready to set it but first your system time has to be accurate. If you are already using ntp and the time is set and correct then you can continue on. If not you need to use 'timedatectl' to set the system time and also the time zone correctly.
timedatectl set-time [TIME]
The time is entered in the format - "2014-11-15 18:17:16".
Once you local time is correct as shown by typing 'date' at the Linux prompt you can go on to setting the clock. To synchronize the RTC to the system type the following:
hwclock -f /dev/rtc1 –w
This sets the RTC, which is /dev/rtc1, to match the accurately set system time
Both of these commands can be executed as a script at boot. I choose to put the script in /usr/local/bin and I called it rtc_init. The script simple has the two initialization lines with a delay before reading.
#!/bin/bash
echo ds1307 0x68 >/sys/bus/i2c/devices/i2c-2/new_device
sleep 2
hwclock -f /dev/rtc1 -s
I then placed the call to this script just after the delay in /usr/local/etc/rc.allstar as shown here:
# start delay, START_DELAY is configured in the allstar.env file
sleep ${START_DELAY}

# Initialize and read the RTC
/usr/local/bin/rtc_init

# enable or disable openvpn
Because the time is up and stable at this point you could probably lower the boot delay. I have successfully used 10 seconds. I would probably not go less than 5 seconds.
Note that the rc.allstar script has a write to the hwclock,
# set clock
/usr/bin/hwclock -w
after the above entries which is still necessary.
|
It is important to note the differences in the BBB clocks as on PC's we often refer to the hwclock as the RTC or vice versa. In this case they are different. On the BBB the hwclock (not referring to a specific device) is a pseudo device which stores the UTC time and date and ticks it forward via SW. This was created to simulate the RTC because the stock BBB has no RTC. It is just set to the system time at boot. The hwclock and the RTC are usually set to UTC time on a Linux system. The system clock which is the one we normally use is corrected by the timezone parameters to local time. When the external RTC is added it is initially set to the correct time from the system clock which has been set manually or via ntp. Then on each boot it is read and it sets the system time but not the hwclock. Thus the necessity to specifically execute 'hwclock -w' after the system clock is updated. |
Here is what my 'timedatectl' looks like after the RTC is installed and configured. Note that the ntp is turned off and both the ntpd and ntpdate services are disabled. The system is only relying on the RTC.
[root@BBB-40638 ~]# timedatectl
       Local time: Fri 2014-11-14 23:11:31 EST
    Universal time: Sat 2014-11-15 04:11:31 UTC
           RTC time: Sat 2014-11-15 04:11:31
          Time zone: America/New_York (EST, -0500)
       NTP enabled: no
NTP synchronized: no
    RTC in local TZ: no
          DST active: no
 Last DST change: DST ended at
                  Sun 2014-11-02 01:59:59 EDT
                  Sun 2014-11-02 01:00:00 EST
 Next DST change: DST begins (the clock jumps one hour forward) at
                  Sun 2015-03-08 01:59:59 EST
                  Sun 2015-03-08 03:00:00 EDT
Sometimes it is a little hard to look at all these clocks at one time to see how they are sync'ed. Here is a rather screwy but quick command line script to display both the system and the RTC clock at the same time at a one second rate on the console. Copy and paste but enter as one complete line.
while true; do clear ; echo -n "sys - `date +%T` RTC - `cat /sys/class/rtc/rtc1/time`"; sleep 1; done
|
While this method of applying the RTC to the BBB Allstar image seems to work OK it could change in the future as we have more time to experiment. Support for this RTC will be included in the next release of the code and if the RTC is installed a user will simply be able to configure it in the allstar.env file. User input is encouraged to help us understand how it is working for you. |
Links
Here are some reference links for i2c on the Beaglebone Black with Archlinux.
- Another implementation and reference for this article
- The Adafruit RTC how-to
- DS1307 datasheet
- Archlinux Time wiki
- DS1307 Kit at Adafruit
- Proto Cape
© 2014 - WA3DSP